I love Easter - traditionally I've always done a big lunch, or contributed with an entree, like last year, where, as a guest I signed up for the roasted lamb; marinated in fennel and green garlic (my favorite lamb recipe)and quinoa salad.
This year, with the little monkey to attend to, I was asked to make hors d'oeurves instead. Not having very much prep time, and also low on my tank of energy, it was imperative that anything I make would be simple, tasty, and of course live up to my reputation as Chef Laura.
It didn't take me too long to figure out that bacon wrapped dates and gougeres where the two best options.
Bacon wrapped dates have, for a long time been a perennial favorite. I love the sweet salty taste of it, and usually combine it with a blue cheese garlic sauce that adds some good kick to it. Also, the name of the dish really describes the recipe. That's all there is to it - except that, of course, you have to bake it until the bacon is cooked. (I like using the uncured bacon from Trader Joes)
Gougeres, or cheese puffs, on the other hand, do require a recipe. They are the epitome of an amuse bouche. Light, yet whetting your appetite, causing you to want more! The first time I made these were way back when I was in junior high. Not having very much experience, they were crunchy for all of two seconds, and then immediately sagged after coming out of the oven. Regardless, they were delicious. The nutty cheese and the light dough (chewy instead of crunchy) actually resulted in me making them the wrong way more than once!
Years later, (without engaging the recipe again) I finally learned the proper way to make them. The secret lies in two thing. One, cooling off the dough before adding the eggs, and two, making sure each egg is fully incorporated before the next one is added. Make sure that you no longer can see steam coming from the dough before the eggs are added. This excess moisture is what contributes to the "sagging". When adding the eggs, you want to quickly beat it into the dough, lest it cook from the heat before incorporating.
You'll get the most success using an electric mixer with a paddle attachment, but it is sometimes too cumbersome to break out the mixer just for this. As an alternative, you will need some very good fore arm strength, either yours or someone else's. If you do it the manual way, use a wooden spoon to do the whole thing, beating very vigorously throughout the whole process.
As an added bonus, after the gougeres are cooked, turn the oven off, and leave the door cracked with the gougeres still in them to let them dry out a bit. This also helps them retain their crunchiness after coming out of the oven.
Here's the recipe:
Gougeres
Makes about 4 dozen hors d'oeurves
1/2 cup Water
1/2 cup Milk
4 oz Unsalted butter
1 cup All Purpose flour
4 ea Eggs
4 oz Hard cheese (Gruyere, cheddar, semi soft blue will work too)
Large pinch of Salt, Pepper and ground Nutmeg
1. Preheat the oven to 400°. Line 2 baking sheets with parchment paper.
2. In a saucepan, combine the water, milk, butter and salt and bring to a boil.
3. Add the flour and stir with a wooden spoon until a smooth dough forms
4. Stir over low heat until dough leaves a film on bottom of pan; about 2 minutes
5. Scrape the dough into a bowl; beat vigorously with wooden spoon or in a mixer with the paddle attachment until no longer steaming about 1-2 minutes.
6. Add one egg into the dough, quickly stirring or beating until egg is properly combined
7. Repeat with remaining eggs, making sure that each egg is fully incorporated before the next is added
8. Add the cheese and a pinch each of pepper and nutmeg and combine
9. Transfer the dough to a pastry bag fitted with a 1/2-inch round tip and pipe quarter sized mounds (or 1 teaspoon each) onto the baking sheets about 1 inch apart. Press peaks down with a wet finger to prevent brown spots
10. Bake for 22 minutes, or until puffed and golden brown.
11. Serve immediately
After dough is portioned and piped (step 9), it can be frozen, then stored.
Place frozen dough on baking sheet when ready to cook, and bake for an extra 5-10 minutes, lowering heat to 375 after 25 minutes if tops get too brown
Showing posts with label Appetizers. Show all posts
Showing posts with label Appetizers. Show all posts
Wednesday, May 4, 2011
Monday, May 10, 2010
Cloudy with a Chance of Meatballs
Did a Mother's Day lunch for a special family over the weekend, and as usual, everything was fabulous, but I got the most props on my famous meatballs, so I'm posting it here!
The secret to making great tasting meatballs? Just use ingredients that you're familiar with, and always, always, do a taste test before you roll them out! If you can let the flavors marinate overnight before rolling them out, even better.
The other great thing about this is that it freezes really well, and you can always have a stash for a quick appetizer, or something to throw into a red pasta sauce for spaghetti & meatballs; but that's only if it lasts that long!
Enjoy ~
Chef Laura's OMG Meatballs
Makes 36, 1 oz meatballs
1/2 lb Ground Beef
1/2 lb Sweet Italian Sausage
1/2 each Onion, sliced into half moons
1/4 cup Sundried tomatoes in oil, chopped
2 cloves Garlic, minced
1/2 cup Feta, Crumbled
2 Tbs Parmesan Cheese
2 Tbs Breadcrumbs
1 tsp Paprika
2 Tbs Olive Oil
Salt & Pepper to taste
1. Heat the oil in a heavy saute pan
2. Add the onion slices, and caramelize on medium until golden brown, about 20 minutes (keep stirring or this burns)
3. Remove from heat, and let cool; chop into a rough paste
4. Combine all the remaining ingredients in a bowl
5. Use your hands to mix well, season with salt & pepper
6. Do a taste test by frying up a small portion of the mixture
7. Divide mixture into 1 oz portions, and roll into balls
8. Arrange meatballs on metal tray and freeze
9. Once frozen, store in airtight container or zip lock bags for up to 3 months
10. When ready to use, arrange meatballs in a single layer on a baking sheet at bake at 400F for 10 minutes
Spinach Yogurt Sauce
2 cups Spinach leaves
2 Tbs Olive Oil
1 cup Greek Yogurt
2 cloves Garlic, sliced
Salt & Pepper to taste
1. Heat the oil in a saute pan, and cook the spinach until wilted
2. Using a food processor, combine all ingredients, and pulse till spinach is finely chopped
3. Store in an airtight container overnight before using, this allows the flavor to develop
Friday, March 20, 2009
Second City Bistro
What I had for lunch:
Pork tenderloin spinach salad, with roasted beets, gorgonzola, granny smith apples & carmelized apple vinagrette from Second City Bistro in El Segundo.
What I would have done differently:
1. Cook the pork a la minute - Pork just isn't good cold. Especially the tenderloin that can dry out pretty easily. It isn't like beef that can be served rare, marinating in it's juices while it cools.
Let rest for 10 minutes at least before slicing
2. Use golden & red beets for livelier presentation - Golden beets also turn slightly pink when their flesh comes in contact with the red beets, so a combination varieties always makes for such pretty amalgamation of colors. I would also have sliced them with a mandolin instead of cutting them up with quarters for easier eating.
3. Same with the Granny smith apples - a julienned cut after being sliced from the mandolin would make piercing the food with a fork easier, instead of having larger, chunkier slices.
4. Crush the roasted hazelnuts, to sprinkle over salad - have you ever tried to pierce a whole roasted hazelnut? This brings me back to point 2 & 3, where I firmly believe a well composed dish not only contains elements that come together well, but that are able to be savored together in one bite. The thing that annoyed me most about this salad was that I would take my fork and stick it into the salad, and all i would get was spinach leaves. Then, I'd have to knife a slice of beets, or scope a hazelnut into my fork to eat them separately.
Why force a deconstruction from a composed dish?
5. Since I also suggested serving the pork a la minute, I'd say to also say to serve the apples & beets at room temperature
Overall, it was a good salad - the flavors were well thought out and married well. Would I make it? Yes - with all the changes above!
Second City Bistro is located in El Segundo's Old Town, just outside LAX, and is open for Lunch Mon-Fru from 11:30am - 2:00pm, and for Dinner Mon-Sat from 5pm.
Thursday, March 19, 2009
Meyer Lemon Oyster Mignonette
Mignonette sauce has traditionally been the perfect accompaniment to raw oysters, along with cocktail sauce - which I often find masks the flavor of the oysters, and so don't like.
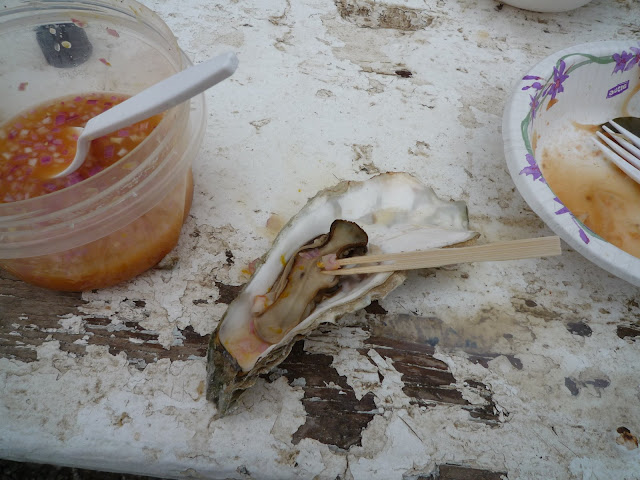
Meyer Lemon Mignonette there on the left - also good with grilled oysters
Typically mignonette is made with a vinegar (cider, sherry, champagne), minced shallots and cracked black pepper. I'm not a big fan of vinegar, so I decided to jazz the mignonette up with another classic condiment to oysters - lemons! What's better than oysters with lemon?
Oysters with meyer lemons!
Meyer lemons are a cross between the traditional lemon, and oranges, (often thought to be mandarin), and came to California from China as an ornamental plant. They are less sour than regular lemons, and have a gorgeous citrus bouquet, that makes me heady every time I put one close to my nose. In my opinion, you can substitute meyer lemons for regular lemons in almost any recipe for a little hint of surprise to the palate.
Take this mignonette sauce along when you're at an oyster picnic, or serve up with your raw bar for a great spring appetizer at home!

Meyer Lemon Mignonette there on the left - also good with grilled oysters
Meyer Lemon Mignonette Sauce
1 ea Shallot, brunoise (fine mince)
2 ea Meyer Lemons, Juiced, and strained to removed pulp and seeds
1 tsp Sugar
2 tsp Black Pepper, Coarsely Ground
Mix all ingredients together and shake to combine well.
Chill before using.
Keeps 2 weeks in the fridge or 3 months in the freezer
Wednesday, March 18, 2009
Tomales Bay Must-Have Steamer Base for Clams
My Mom and little brother, Ed, came to visit recently, and since they both love oysters, we figured that a trip to one of the Oyster Farms at Point Reyes was appropriate.
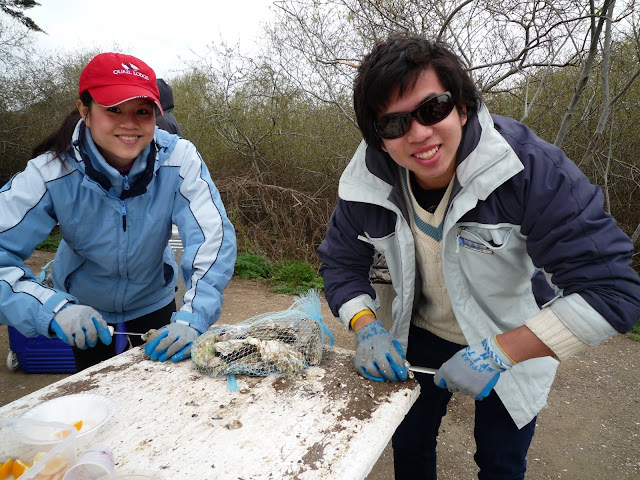
We visited Tomales Bay last time when my friend Darryl came to visit, and were caught completely unaware at the possibilities of what we could do with the fresh catch (Oysters in 5 different sizes, mussels & clams)! This time, we came prepared, with steamer base for the clams, and chowder base for the oysters.

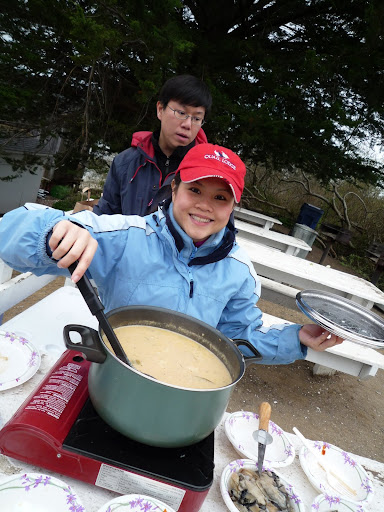
Everything turned out delicious, but the one must have that I'm bringing on all these picnics, is the Steamer Base. While you can BBQ the large oysters, clams are pretty little, and you end up losing a lot of their delicious clam liquor when they open up on the grill.
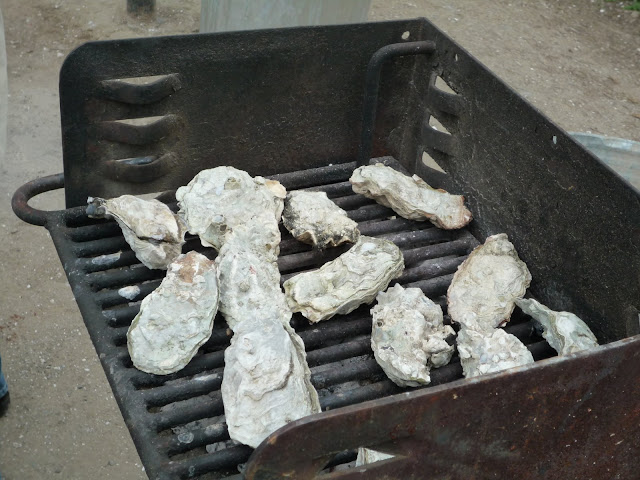

I brought a portable gas stove and a pot for the clams, but if you don't have a stove, you can simply put a pot on the grill, slowly let the clams open up and cook. Yum.
This is also perfect for non-picnic days, as an impressive, elegant appetizer. Toss with spaghetti for a filling main, and I guarantee that folks will be coming back for more.

We visited Tomales Bay last time when my friend Darryl came to visit, and were caught completely unaware at the possibilities of what we could do with the fresh catch (Oysters in 5 different sizes, mussels & clams)! This time, we came prepared, with steamer base for the clams, and chowder base for the oysters.


Everything turned out delicious, but the one must have that I'm bringing on all these picnics, is the Steamer Base. While you can BBQ the large oysters, clams are pretty little, and you end up losing a lot of their delicious clam liquor when they open up on the grill.


I brought a portable gas stove and a pot for the clams, but if you don't have a stove, you can simply put a pot on the grill, slowly let the clams open up and cook. Yum.

This is also perfect for non-picnic days, as an impressive, elegant appetizer. Toss with spaghetti for a filling main, and I guarantee that folks will be coming back for more.

Make the base up to 3 days ahead, or freeze for up to 3 months
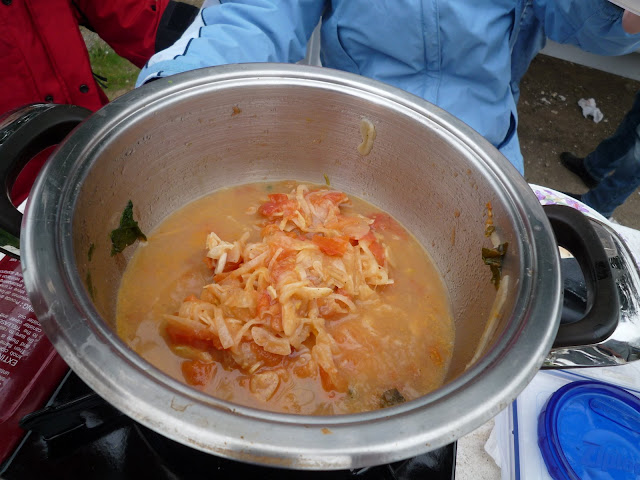
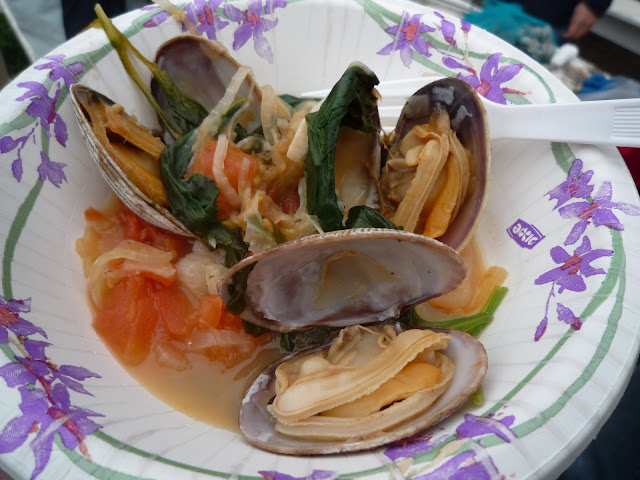
Steamed Clams with Fennel and White Wine Broth
Serves 6-8
4 lbs Manila Clams
12 oz bag Baby Spinach
1 batch Steamer Base, Recipe below
Bring the steamer to a boil in a large pot
Add the clams and spinach
Cover pot, and lower heat to simmer
After 8 minutes, check to see that most clams have opened, if not, cover and check again in 5 minutes
Discard any clams that are unopened
Garnish with parsley and serve immediately
For a main course, toss with 1 lb of cooked spaghetti
Steamer Base
1/2 ea Yellow Onion, thinly sliced into half moons
1 ea Leek, white part only, thinly sliced
1 ea Fennel Bulb, thinly sliced - I used a mandolin for this
5 ea Garlic Cloves, thinly sliced
2 tbsp Olive Oil
1 bottle Crisp White Wine, Sauvignon Blanc, Pinot Grigio, or Riesling will work
1 cup Clam Juice or Chicken Broth
3 ea Roma Tomatoes, diced
1 sprig Thyme
1 ea Bay Leaf
5 ea Pepper Corns
2 tbsp Parsley, chopped to garnish
Heat the oil in a large saucepan
Add the onions and leeks, and saute until translucent
Add the garlic and fennel, and saute for 1 more minute
Add the rest of the ingredients, and bring to a boil
Turn to to a simmer, and cook until liquid has mostly boiled off, but vegetables are still moist
Cool and chill for later use
Subscribe to:
Posts (Atom)